Wanting to build a directory listing similar to Yelp, Zomato, or Foursquare is not that far-fetched. Even competing with such big names is not really out of the question.
With big-name directories tending to focus on a larger, nationwide scale, there seems to be an open opportunity for website owners to take advantage of the smaller, more localized listing directory needs of the customer.
Helping people find their favorite restaurant, a local mechanic, or any other business provider or attraction is something you can do with knowledge about the local area.
If you have the right tools of course.
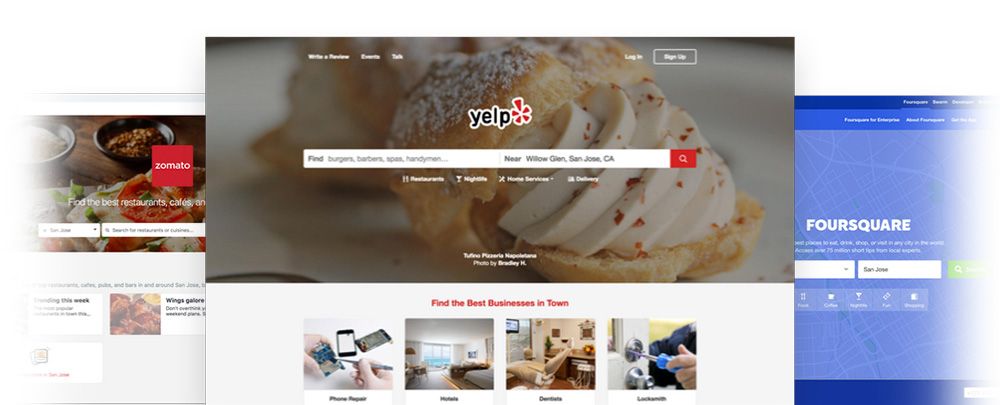
Unfortunately, building a listing directory from the ground up often takes many WordPress-friendly tools. After all, you need to be able to feature unlimited listings, include ratings and reviews, add geographic information in the form of interactive maps, offer multiple price packages for those wanting to include their listing on your site, and so much more.
Sure, there are many effective tools on the market today that can help you build a directory listing right within your WordPress dashboard. But they come separately and many of them are premium, meaning you have to shell out extra cash for them.
Luckily, there are quite a few options (see the best directory WordPress themes) but the one that offers the most bang on the buck while being easy to setup is ListingProWP.
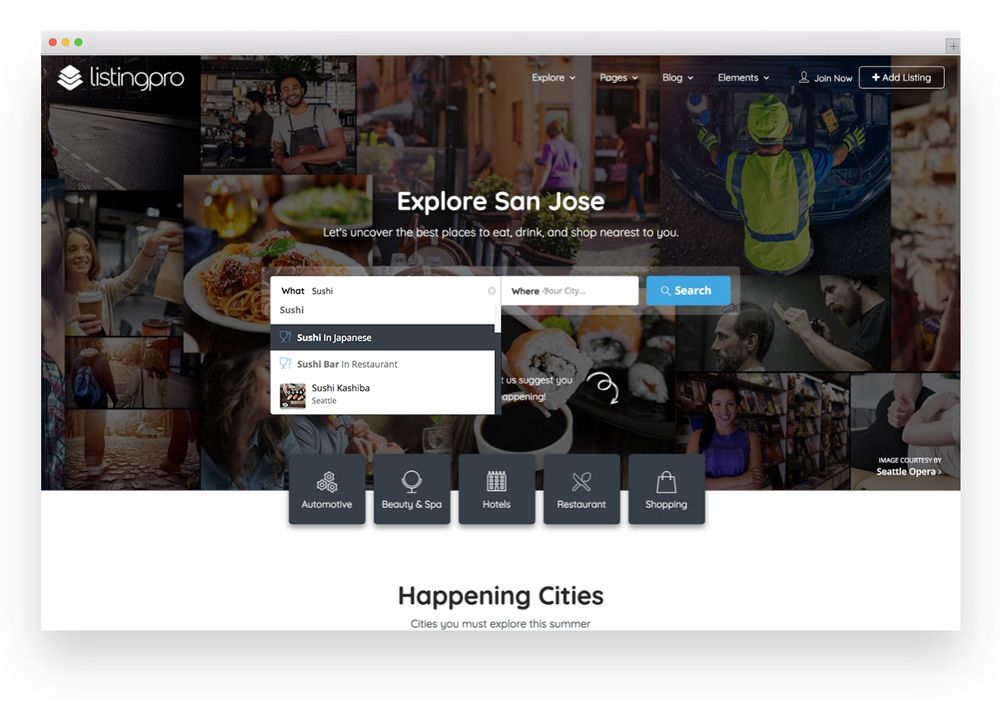
ListingProWP is a WordPress theme designed to give you everything you need to build a fully functioning directory website in one convenient location.
Today, we will look at what a directory is, why you might benefit from starting one, and why ListingProWP is the most powerful tool on the market for helping you with your directory listing dreams.
And to top it off, we will take an inside look at ListingProWP and see just how easy it is to create a directory using this comprehensive WordPress theme.
So, let’s get started.
What is a Web Directory?
A web directory is a collection of websites divided into specific topics, categories, and interest areas. They can cover broad niches, such as local restaurants, or specialize in smaller niches like all local plumbers.
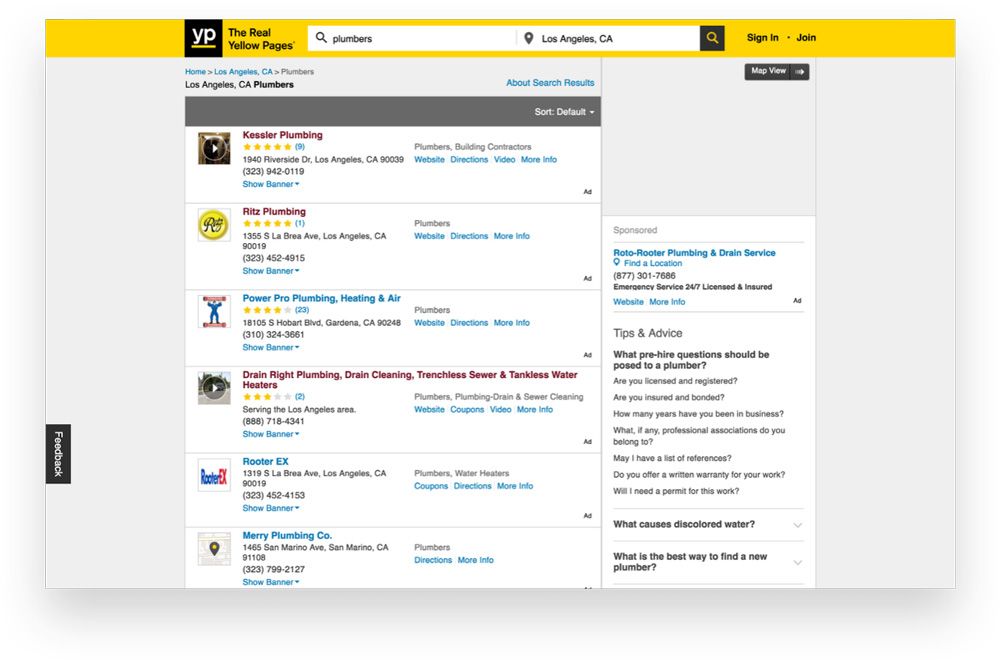
When users enter a web directory, they search terms related to what they are looking for. Based on what that directory has listed, the user then views many links to websites that may help them with what they need.
Each listing typically includes an external link to the website and a small description so users can know if the business in the listing has what they are looking for.
Web directories highlight entire websites, rather than single one-off web pages, and the results always come to you in an organized list-making scanning easy on the user.
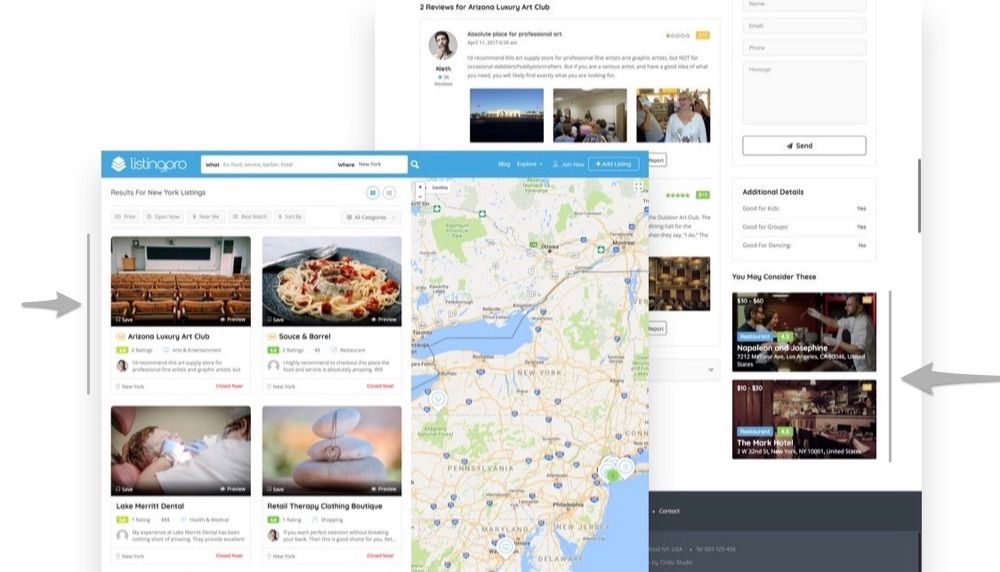
Advanced Search Result & Filter with Map
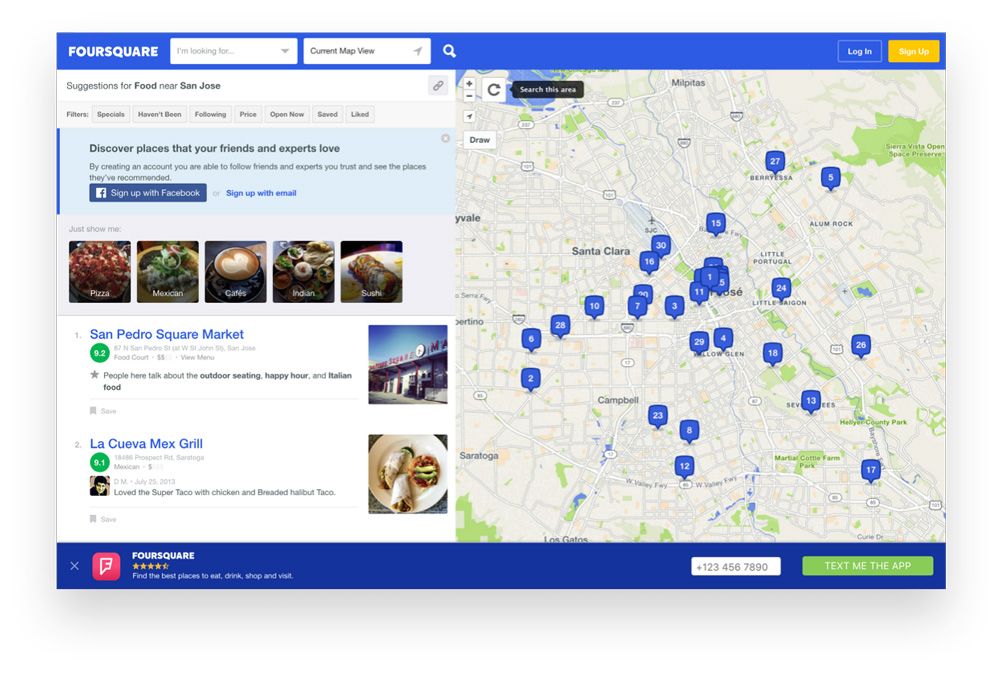
A reliable web directory will have extensive search and filter functionality so website visitors can quickly and easily find the business they are looking for. They will also have a map, complete with nearby listings should the site visitor want more options.
Review and Rating System
A good web directory also has user review and rating functionality so people new to the listing can decide whether to trust the business they are interested in or not.
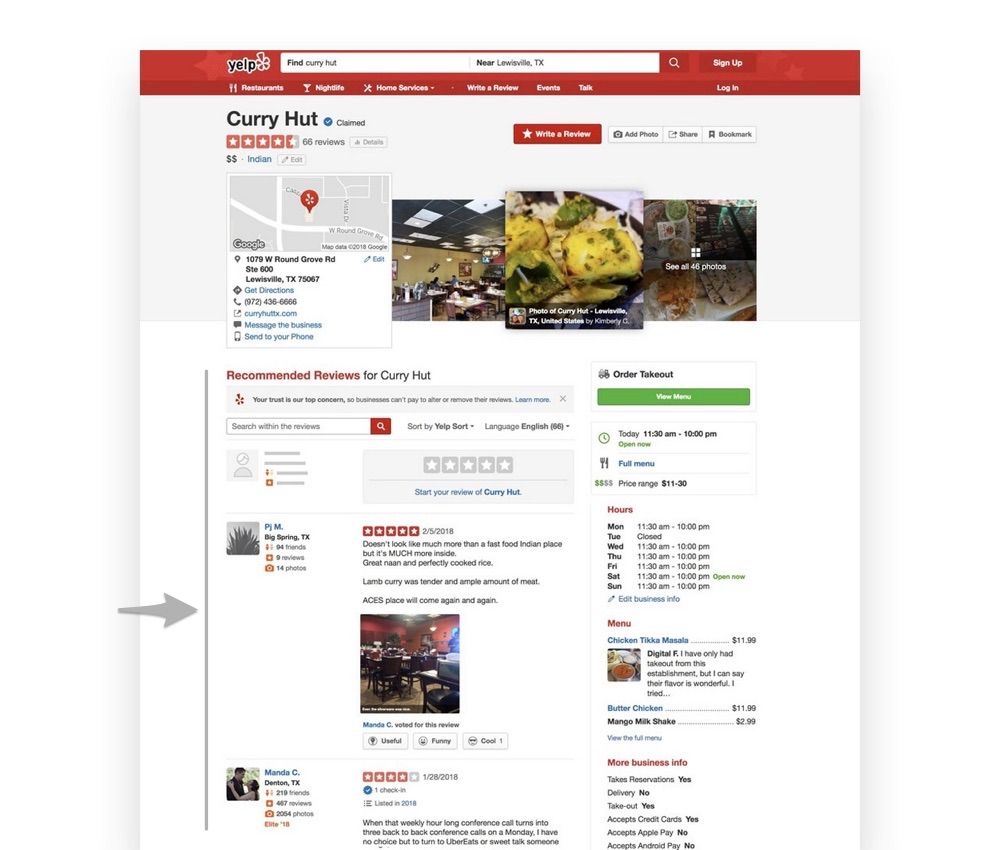
On the backend, a solid web directory solution will give you plenty of ways to monetize your site and manage your listings without a lot of extra work.
The Benefits of Creating a Web Directory
Unlike major search engines such as Google or Bing, which are crawled by spiders and indexed according to how these bots interpret site information, actual humans create web directories.
This means that the websites included in the directory will always relate to the search term a user enters, eliminating the frustration of having to skim through hundreds of search results only to find a few good websites to visit.
In addition, everyone is looking for a way to make some extra cash these days. And, it just so happens that not only do well done web directories gives site visitors a definitive place to find what they are looking for, they offer website owners a way to cash in on what they know about the local area.
Take a look at these common ways website owners are monetizing their web directories:
- Paid Listings. Charging business owners to submit their business to your directory is the most common way to monetize a directory website. You can offer different pricing plans if you want, each with their own set of benefits, and make money just by having people promote their company on your website.
- Membership Model. You might consider offering extended time slots for sites on your directory for a recurring fee. This gives businesses a more permanent spot in your directory that is sure to be found by users over and over again.
- Advertisements. If your web directory is highly trafficked, you have the potential to make a lot of money through advertisements. Selling ad space in the form of text, banners, and video ads is another great way to monetize your web directory.
Altogether, besides the fact that you can earn a living by creating a extensive web directory, you can also help site visitors in the nearby area find what they are looking for so they don’t have to skim the thousands of options available in search results or even major directories like Yelp.
So, What is ListingPro?

ListingPro or ListingProWP is the most comprehensive WordPress theme designed to give site owners looking to create a web directory everything they need in one convenient location.
Built from the ground up as the market’s only end-to-end directory solution, the one thing separating ListingProWP from the rest of the competition is that there is no need to enlist the help of any third-party plugins to build the bulk of your web directory.
All the core features you will need to build a successful web directory come straight.
Because ListingProWP’s feature set is so inclusive, it would be impossible to cover every feature. That said, we can take a look at some of the most exciting features offered so you can get an idea of just how great this all-in-one web directory solution is.
But first, here is a quick roundup of core ListingProWP features you might not expect from any web directory theme to offer out of the box that are close to the features we looked above from some real-world examples:
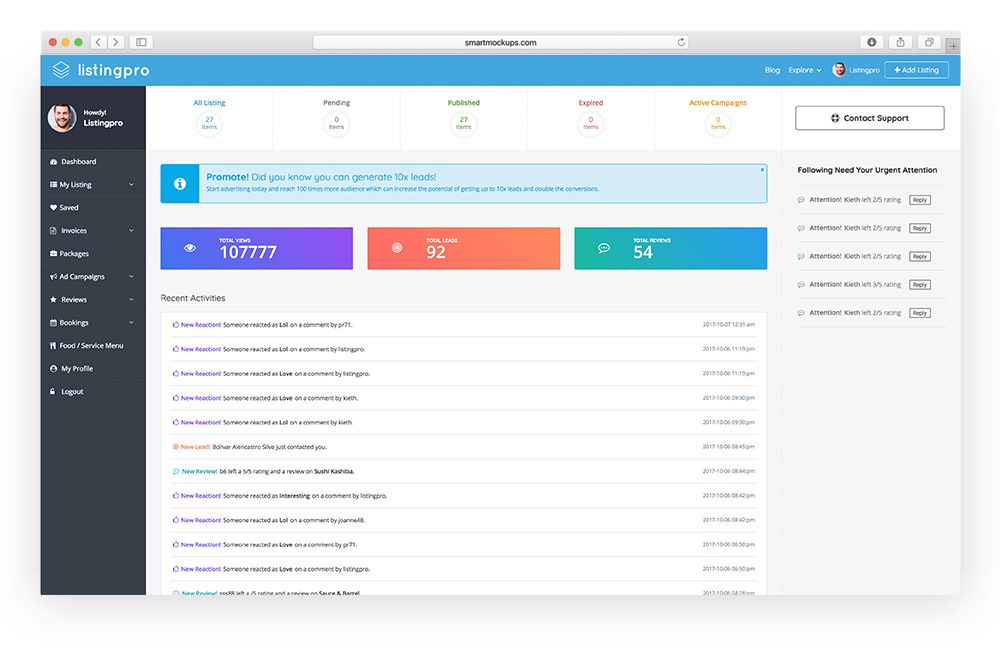
[Built-in] Business Owner Dashboard
Get intuitive dashboard for use by businesses listing owners on your site right out of the box. Your users can take full control of their business from a single most powerful front-end dashboard to help double your revenue.
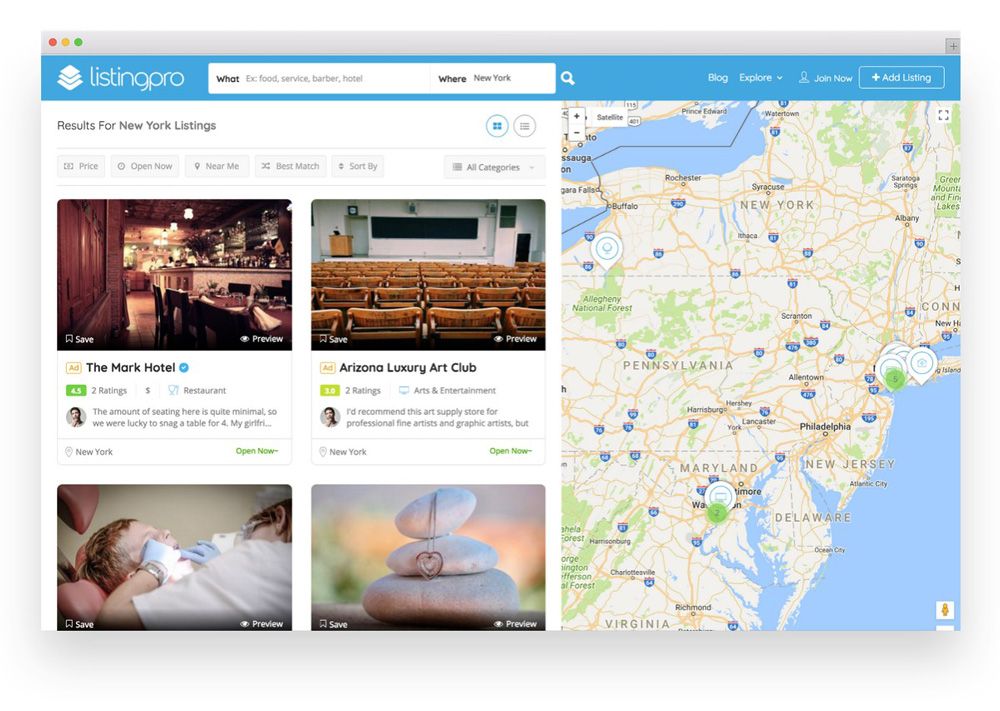
[Built-in] Advanced Search Result & Filter with Map
Users can easily find a business using a keyword, or select a keyword in a category or go to a listing right from the quick results and then they can easily filter to narrow the search results.
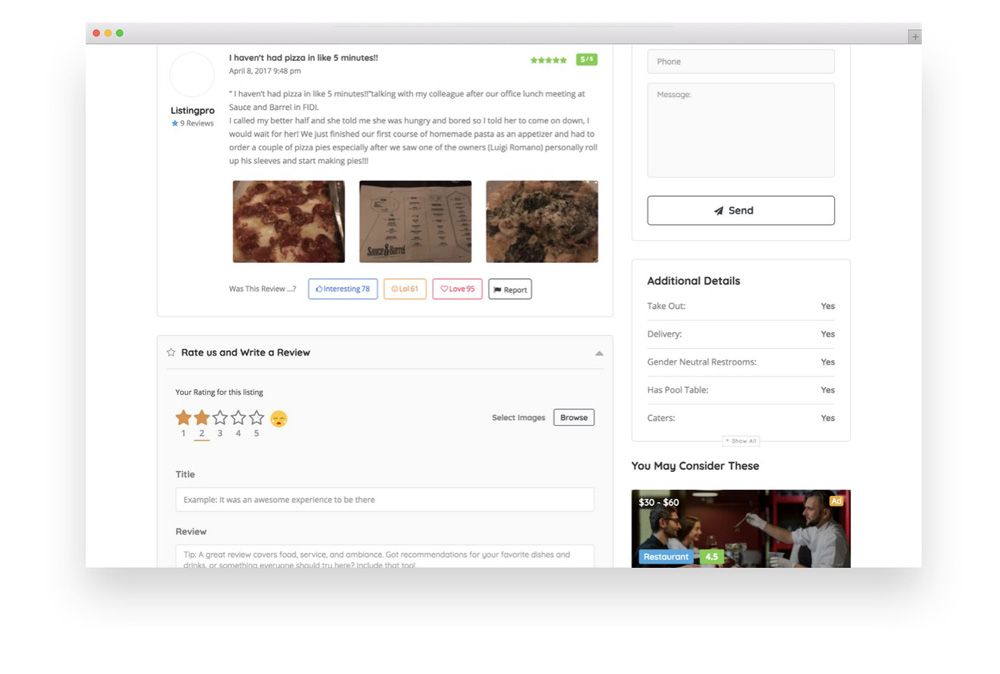
[Built-in] Review and Rating System
Review and Rating system that includes image uploads and voting. Visitors will think before leaving low star rating with the emoji (emotion-based) rating system. It also have an option to vote on individual reviews.
[Built-in] Ads Campaign Management
Category specific multi-ad spots so businesses can promote and you can get paid. Run Targeted Ads from home page ads to listing details page.
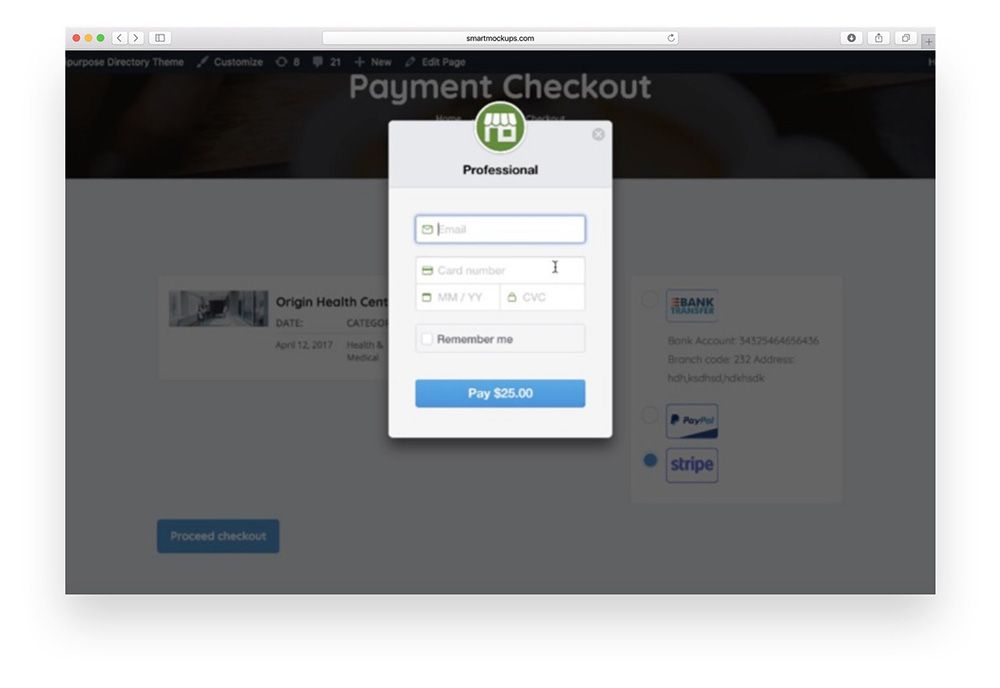
[Built-in] Checkout Process without WooCommerce
The checkout process for paid membership and ads campaign has payment gateways integrated out of the box such as Stripe, PayPal, and 2Checkout. A recurring payment option is also available with Stripe.
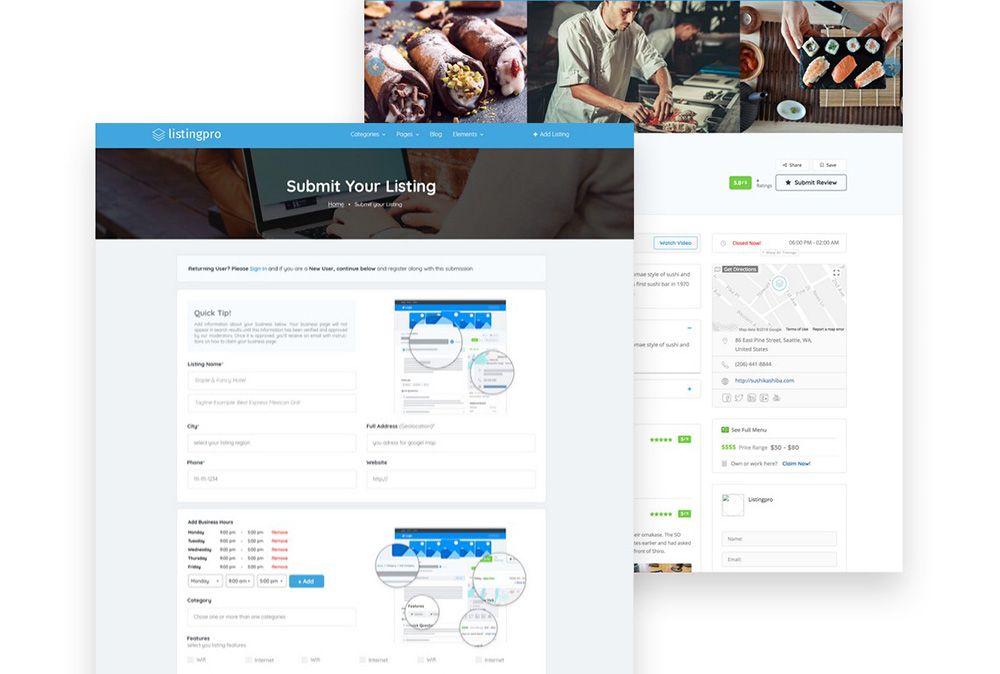
Built-in Front-End Submission (FES) support
To help increase conversions, we have carefully crafted the submission page by breaking it into sections and prioritizing fields order.
Enabling front-end listing submission by new users without signing in allows the visitors to invest time in creating a listing and then preview it before paying to publish.
Any WOW features to lookout for?
Yes, additionally, there are some killer WOW features that might not be too obvious but as you dig into the product you will learn.
Customize Listing Details Page with Drag & Drop
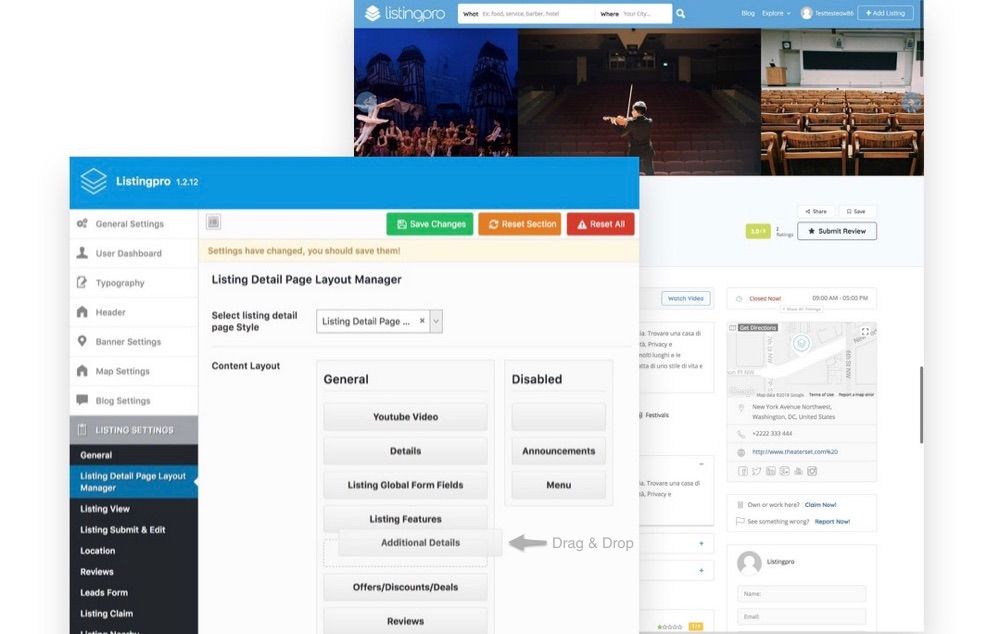
Building a web directory has never been easier thanks to ListingProWP’s built-in drag & drop technology helps make advance layout changes to the Listing details page. Though there are plenty of ways to build a functional listing directory within the WordPress CMS, ListingProWP’s drag & drop functionality and Visual Composer, the most popular drag & drop Page Builder helps even the most novice of website owners build unique websites.
Decide how you want your site to look, function, and feel when site visitors check you out. Make easy changes that are effective immediately, and most likely you will never mess with a single line of code. Lastly, split content into sections so your web directory is consistent across the board, no matter which business you highlight. It is that easy.
Multi-Operational Hours
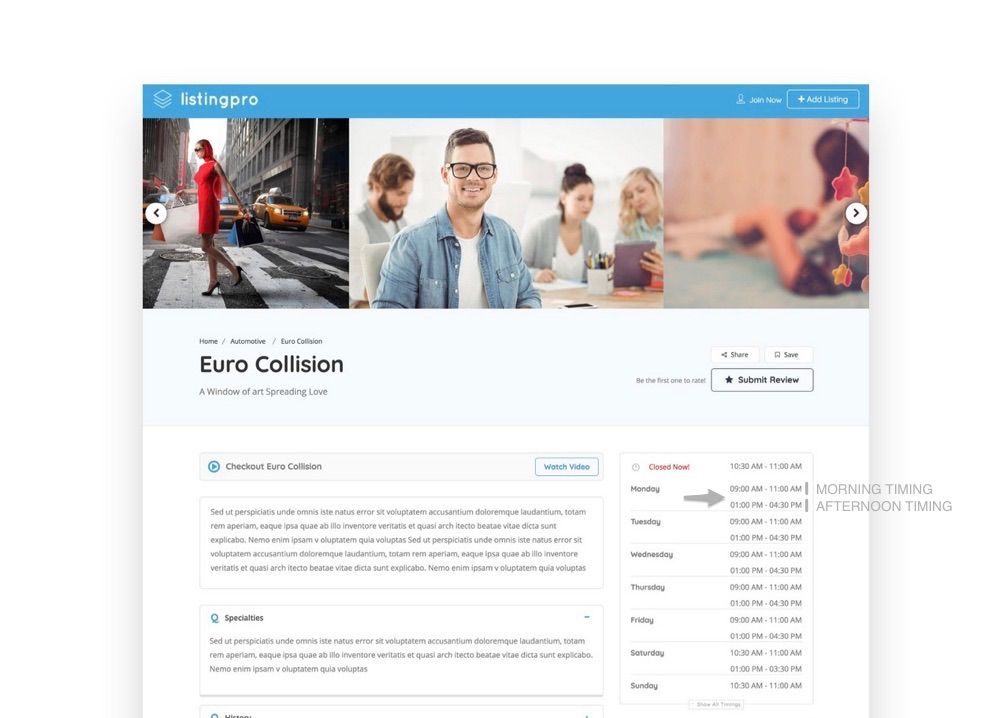
Make it easy on businesses in your directory to set their business hours with the multi-operation hours feature. Split the weekend hours, include "closed for lunch" time slots, and even easily extend operating hours during seasonal times so site visitors always know when your directory listings are open and ready for business.
With the collapsible business hours functionality, site visitors can see business hours based on the listing’s geolocation, and even see things such as Open Now and Closed Now. Your site visitors will never wonder if your listings are open for business. If all that sounds exciting then how about if I tell you that it also support businesses that’s open past midnight and it consider it as the same day for example if the business opens at 5pm and closes at 2am late night, even though the next day is already started it will count it as the same day when showing the Open Now or Close Now indicator.
Narrow Search and Suggest Nearby Listings
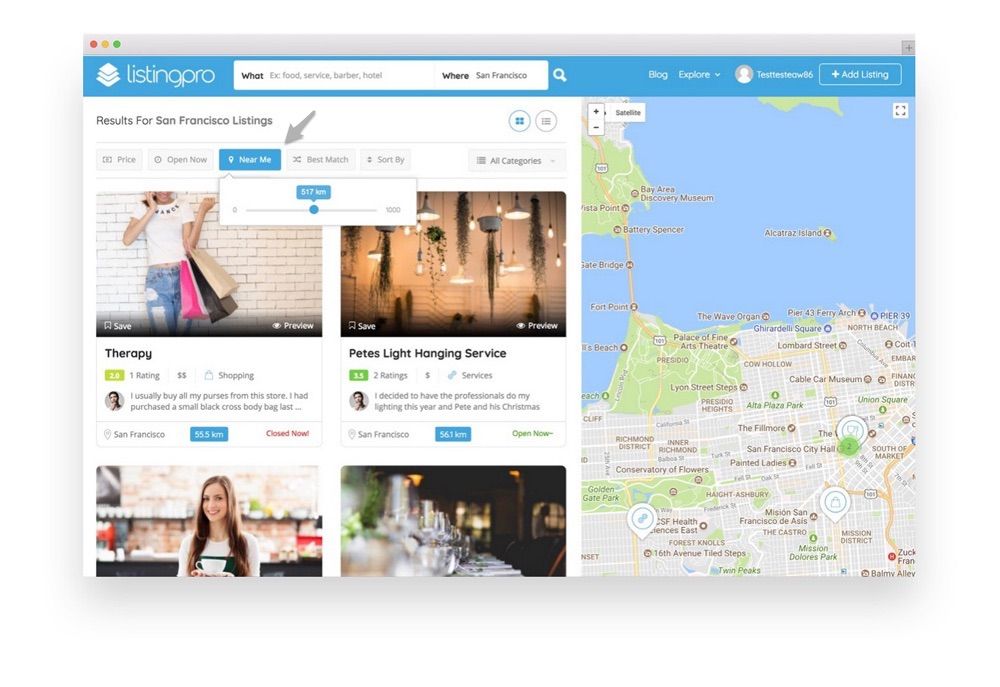
It’s not enough to include contact information, addresses, and even interactive Google Maps on your web directory. Site visitors want everything to be as simple and convenient as possible to find what they are looking for.
They can now narrow search results based on their geographic location using the exclusive NearMe search function. Display listings to site visitors within a specified search radius or even include exact distant matches thanks to the advanced radius (distance) slider functionality and it’s well-thought UI/UX.
In addition, ListingProWP allows you to display nearby listings to site visitors based on search criteria and categories they are already browsing. This is like the related posts function you see at the end of blog posts.
Designed For Mobile: Beyond Just So Called 100% Responsive On Mobile
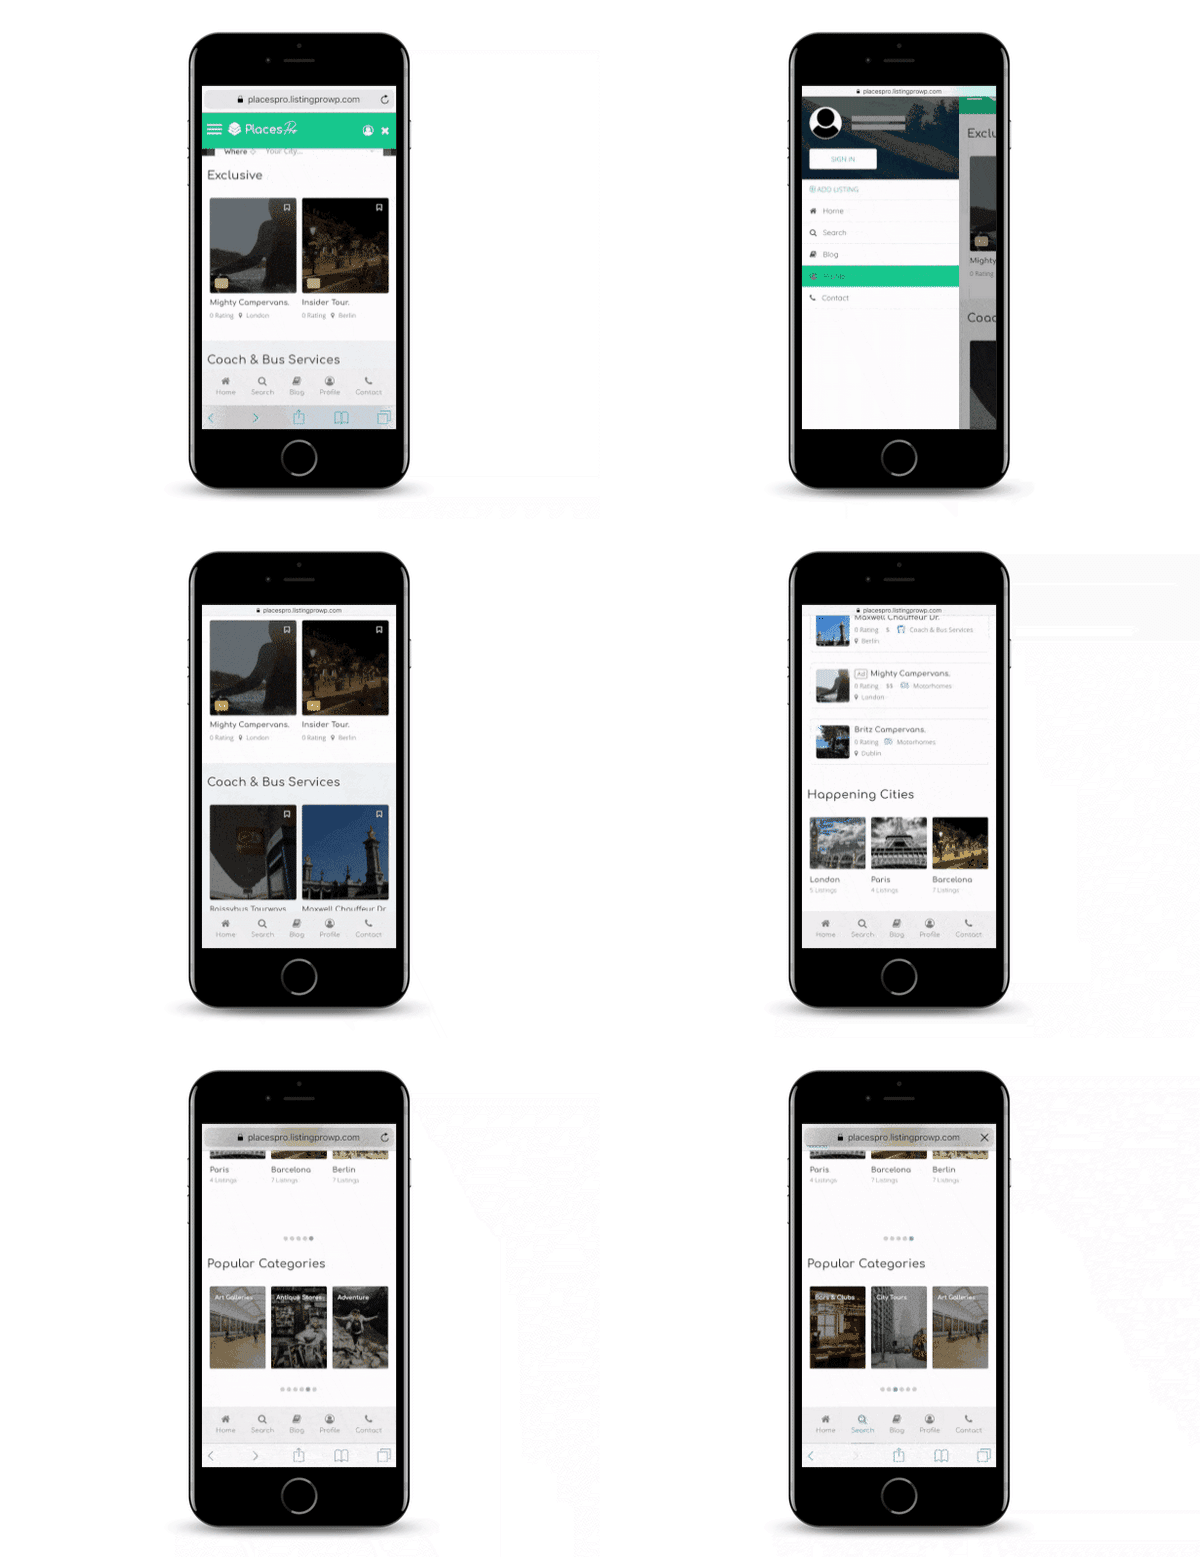
Though having mobile-friendly design is a given these days, no matter what type of website you are running, the mobile design here tops the user experience and helps make your web directory look and feel like a mobile app when people visit on-the-go.
Many features make ListingProWP one of the best WordPress directory themes on the market to date. If you want a more comprehensive look at available information, check out more info in the theme’s listing.
How to Create a Web Directory
Now that you have a general idea what ListingProWP has to offer site owners looking to build their own web directory, let’s look at how to build a web directory starting with theme installation and activation.
STEP 1 – Installation and Activation
ListingProWP installs like any other WordPress theme. Navigate to Appearance > Themes > Add New and install and activate the zip onto your website.
The neat thing about ListingProWP is that upon installing and activating the theme, you will be prompted with a helpful setup wizard that will let you download all of the included plugins and dummy content needed to build your directory right onto your website.
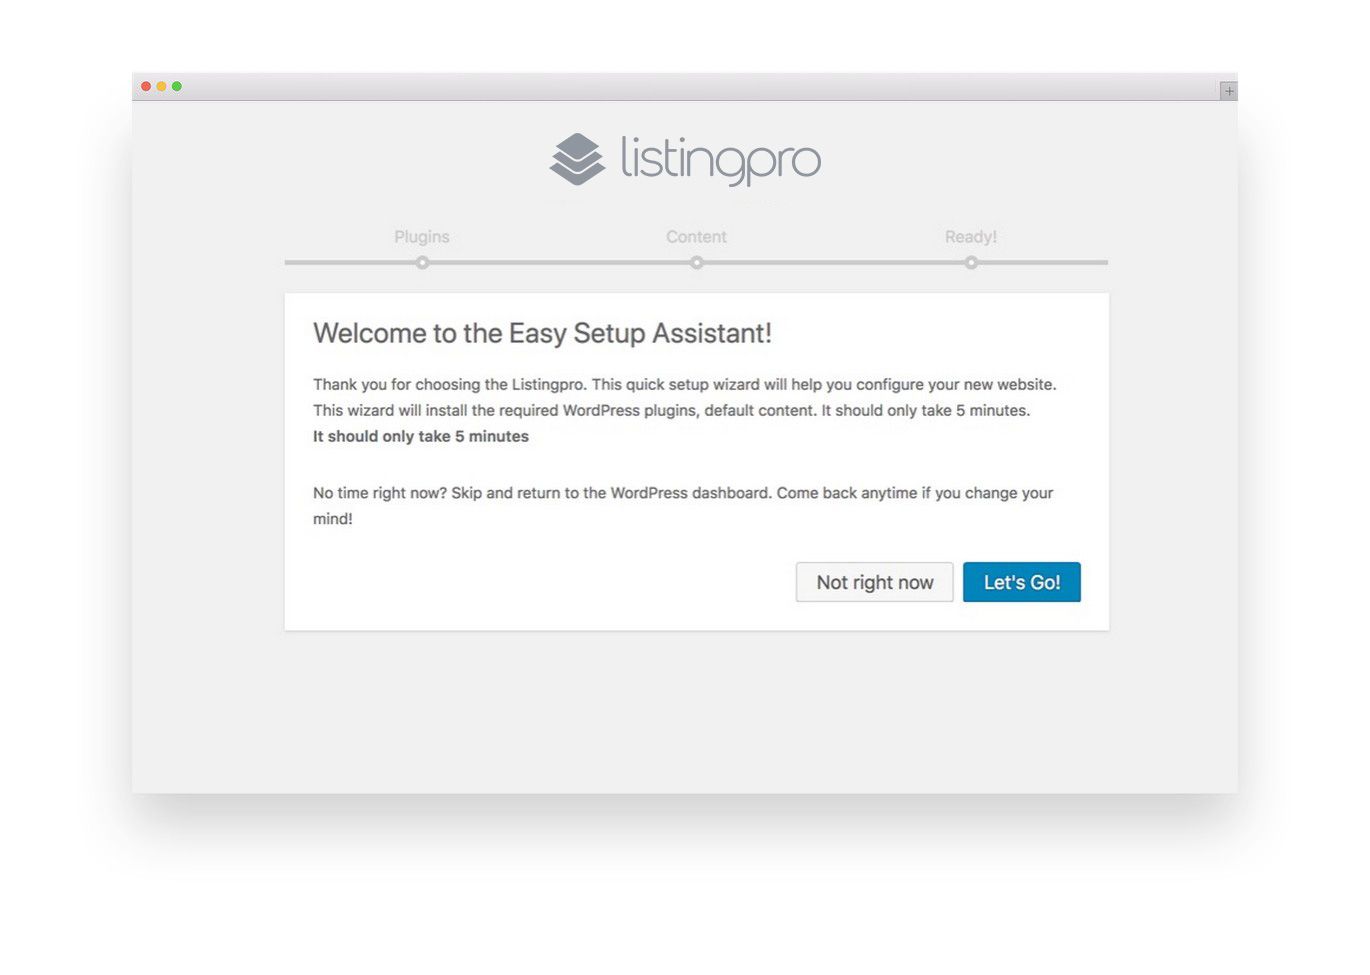
Pre-set plugins that you’ll download onto your site include the following:
Three Plugins Developed by Cridio Studio (Team behind ListingPro)
- Listingpro Ads
- Listingpro Plugin
- Listingpro Reviews
Three 3rd-Party Plugins
- Nextend Social Connect
- Redux Framework
- Visual Composer
Having a setup wizard makes initial installation and kickstarting of your site easy.
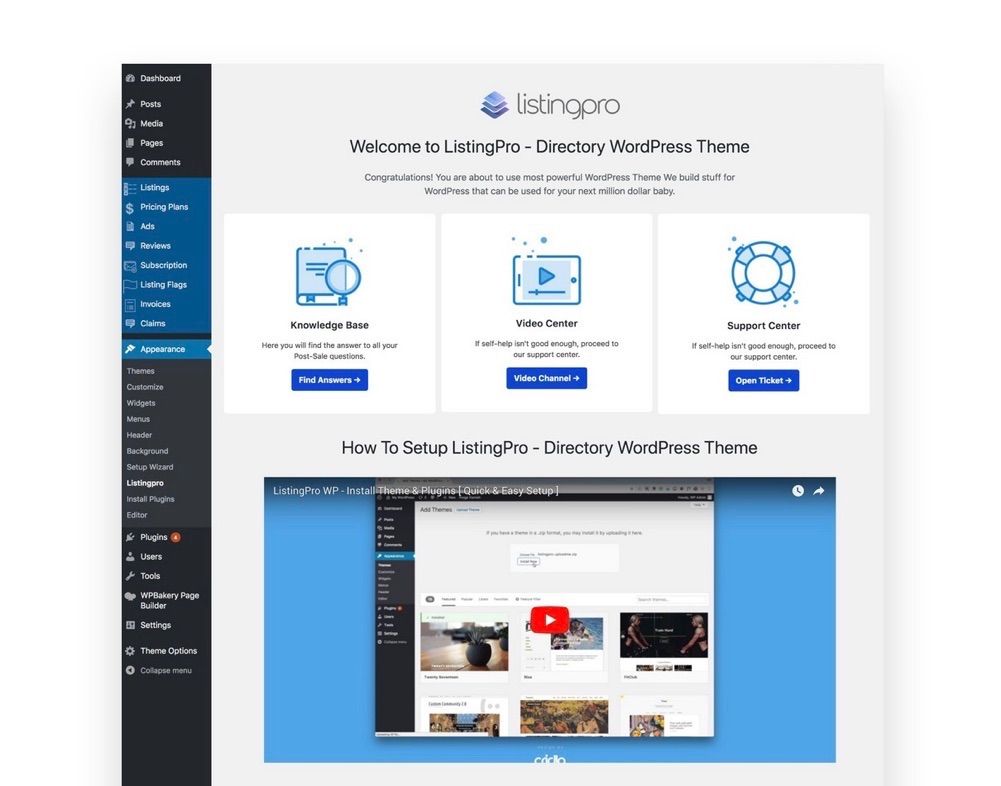
All you have to do is click a few buttons and you will have a fully functional directory website with dummy content in place, minus all of your unique directory listings. You must activate the theme using the purchase code key to unlock all the features.
STEP 2 – Customize Your Directory
After successful installing and activating the ListingProWP theme, and installing all of the tools and dummy content needed to get you started, you should move on to the design stage.
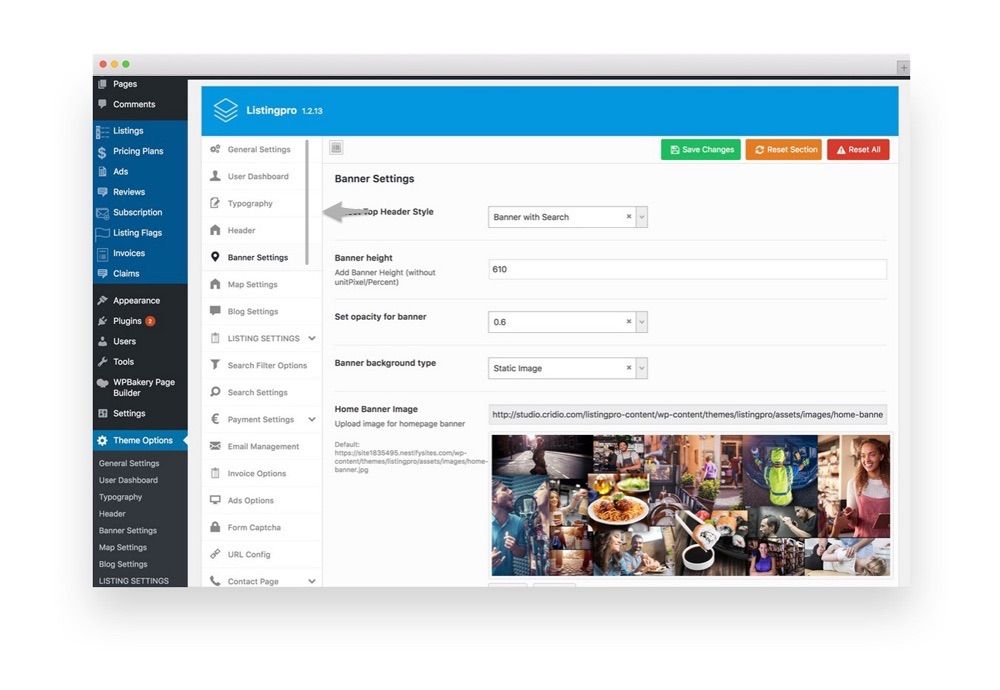
Navigate to the newly created Theme Options menu item and click on General Settings to see a lineup of everything you can customize.
Though you can customize every element on your web directory, and should, it is recommended you focus on the first five categories when just starting to get a solid foundation.
- General Settings. Here you define things like your theme colors, currency symbols, banner and search fields, and geolocation functionality.
- User Dashboard. If you want those listing their business on your web directory to have access to the frontend dashboard for managing their own listings, this is where you enable this functionality. In addition, enable things like bookings, reservations, menus, invoices, reviews, and more.
- Typography. Change the font on your directory to match the look and feel you are after. This includes the body font, navigation styling, headings, and paragraphs. You can change the font family, weight and style, size, and of course, font color.
- Header. Determine which header layout you want to use, the color schemes, whether to include a header search field, and even upload a custom logo for better brand recognition when site visitors come to your directory.
- Banner Settings. The first impression site visitors have when they land on your website is important. Decide whether to include a search field or map within your banner, upload an image, and determine whether to make the banner background a static image or a video for added visual appeal. In addition, add categories that will show in the banner or as a dropdown menu for easier navigation of your directory.
You also have access to things like your Maps, Blog, Listing, Payment, and Contact form settings, which shows you how all-inclusive this theme is.
All available under General Settings and more options in the WordPress dashboard (e.g. Listings, Pricing Plans, Ads, Reviews, Subscriptions, Listing Flags, Invoices, and Claims) ListingProWP doesn’t skip a beat when it comes to creating your entire web directory website.
STEP 3 – Configure Payment Settings and Other Admin Settings
You start a web directory to capitalize on the knowledge you have about nearby businesses to make money. That’s why configuring the payment settings is so important. After all, you’re not going to let everyone list their business on your website for free.
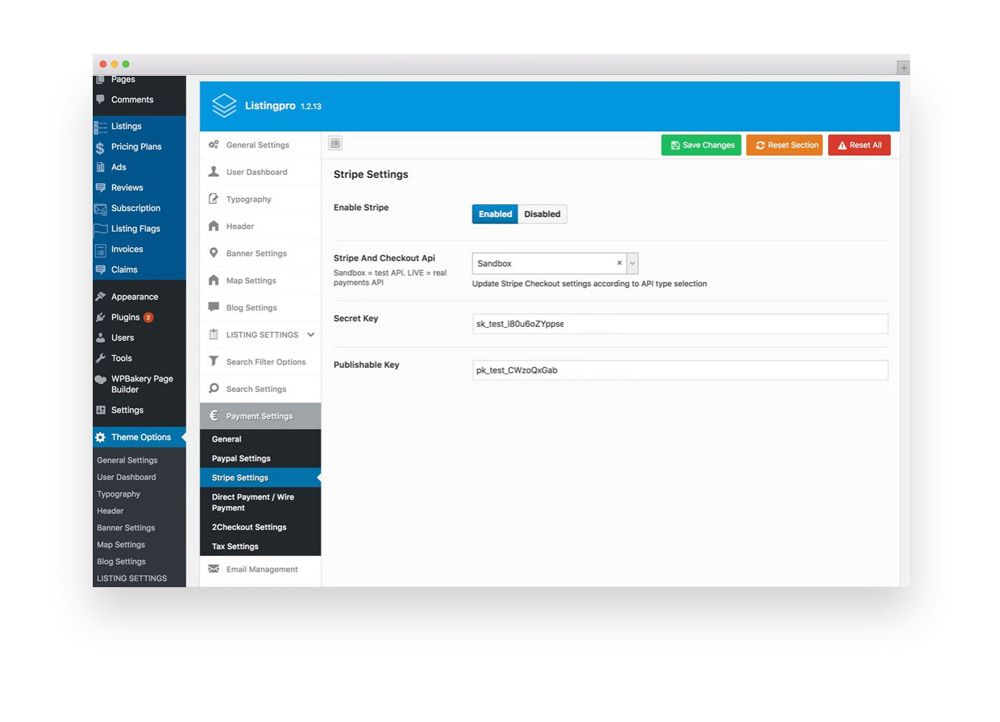
Navigating to Payments tab under Theme Options will get you started in the right direction.
In addition to general Payment Settings, there are other administrative settings to handle, such as Email Management, Invoice Options, Ads Options, Form Captcha, and URL Configuration.
But to start, let’s take a look at the Payment Settings:
- Configure your PayPal, Stripe, and/or 2Checkout settings for collecting payments on your website
- Set up direct or wire payments
- Define whether new listings need admin approval
- Enable paid listing submissions and define the currency
- Select a Checkout and Thank You Page
- Set up terms and conditions
Email Management
This is the section where you can customize the emails sent out to users who list their businesses on your website. For example, welcome emails and confirmations for listing submission and making a payment are just some of the kinds of emails you can send.
Using the WordPress TinyMCE editor, configure each type of email you want sent out based on a user’s behavior. In addition, configure the email content for admin confirmations when an email is delivered.
For example, suppose you want to send an email to new users, complete with a welcome message and their login information. In that case, you might also send an email to yourself, (or whomever is in charge on your team) informing you that someone new has registered.
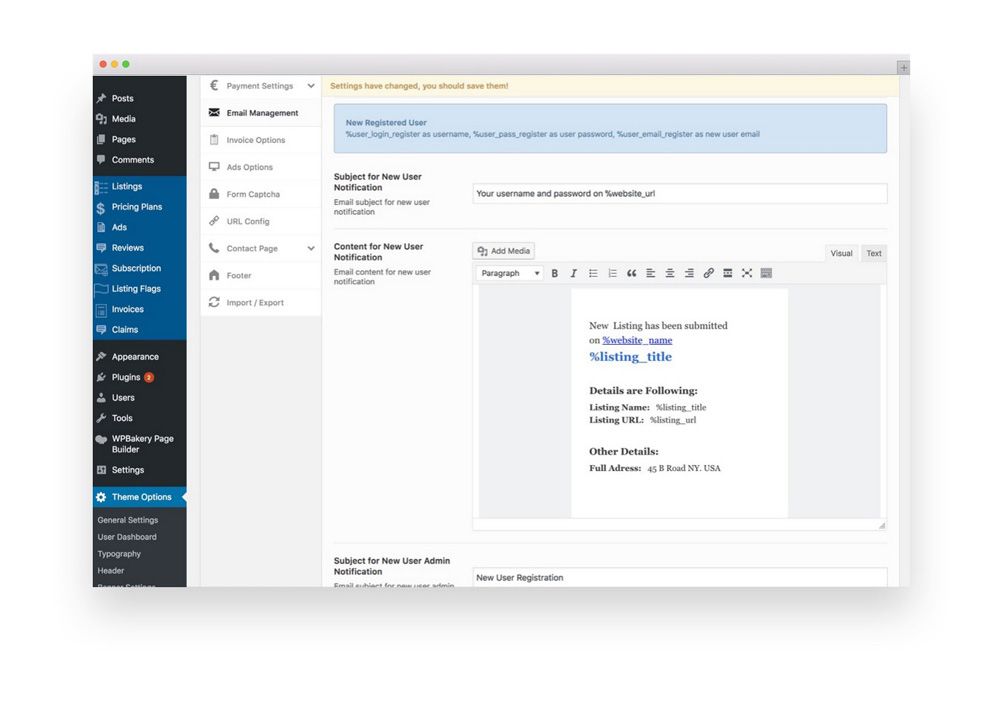
You can even personalize emails with usernames by taking advantage of ListingProWP’s variables, all of which are included above each different email template for your convenience.
Invoice Options
If you want to send out official invoices to customers listing their business on your website, ListingProWP makes this easy to do right from your WordPress dashboard.
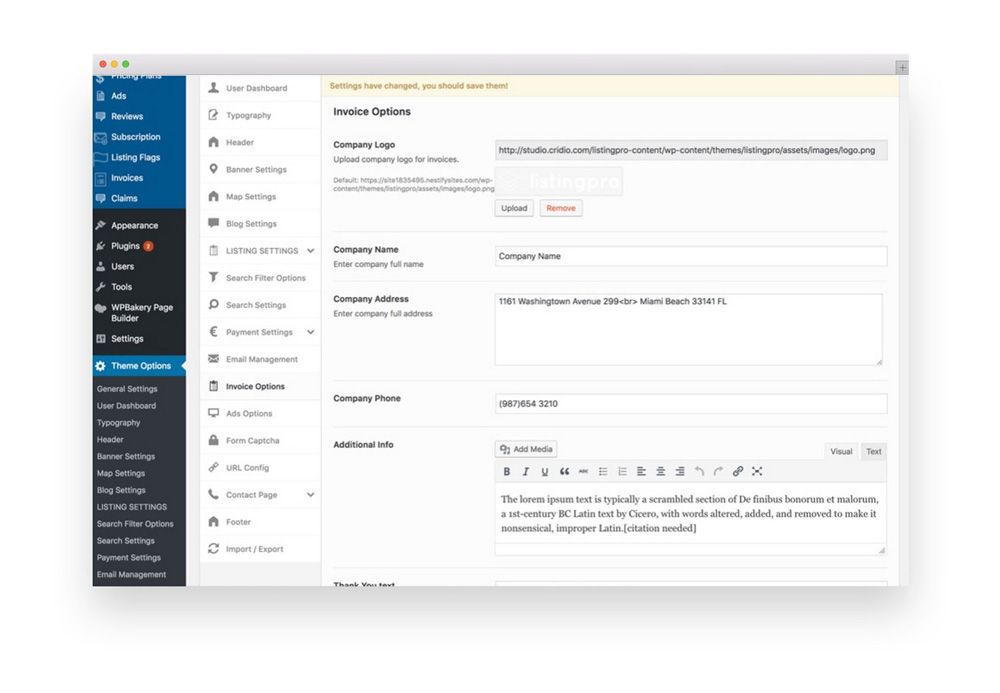
Fill out the template with your information that will appear on any invoice you send to users. This includes your company logo, name, address, phone number, additional information you want to include, and a thank you message at the end.
Ads Options
To boost the revenue your web directory is generating, consider enabling an Ads campaign feature and set a price and duration for different Ads options that can be displayed randomly (example: Home page), on listing details page and on top of search result or category page, and also customize per your brand.
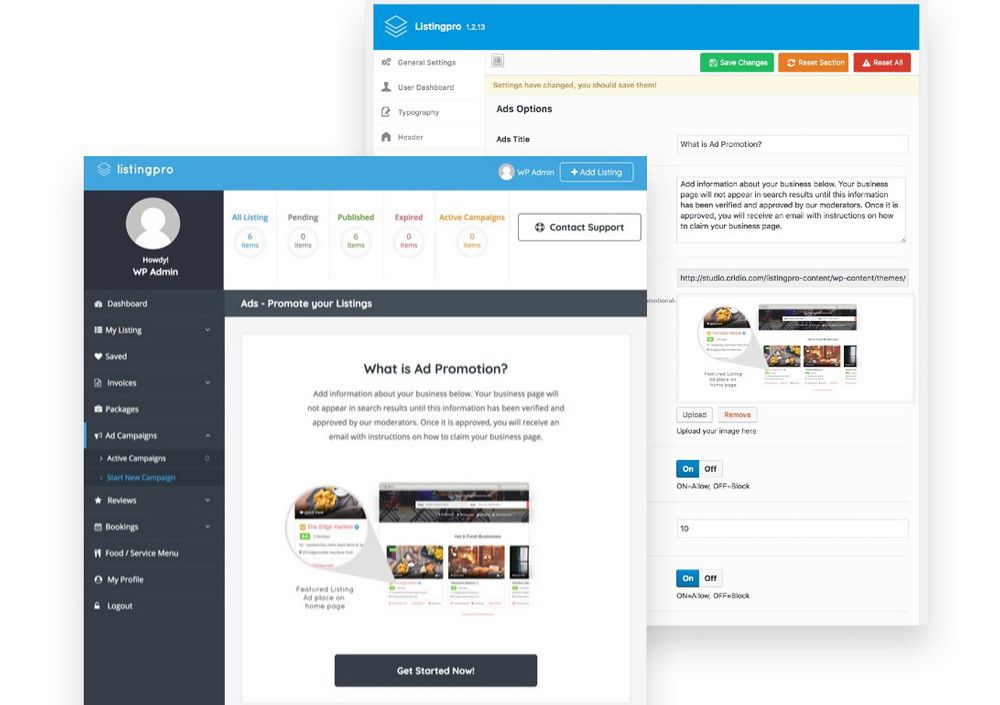
When a listing owner set up a new ad campaign for their business, they will then see it in their dashboard and have the option to opt for an Ad option if they so choose.
Form Captcha and URL Configuration
If you want to enable captcha technology to your site’s forms for added security and prevent spam registrations, simply enable the button under the Form Captcha section.
Lastly, click on URL Config to configure the page URLs for some pages on your site, such as the Author Page, Submit Listing Page, Edit Listing Page, and Price Plans Page.
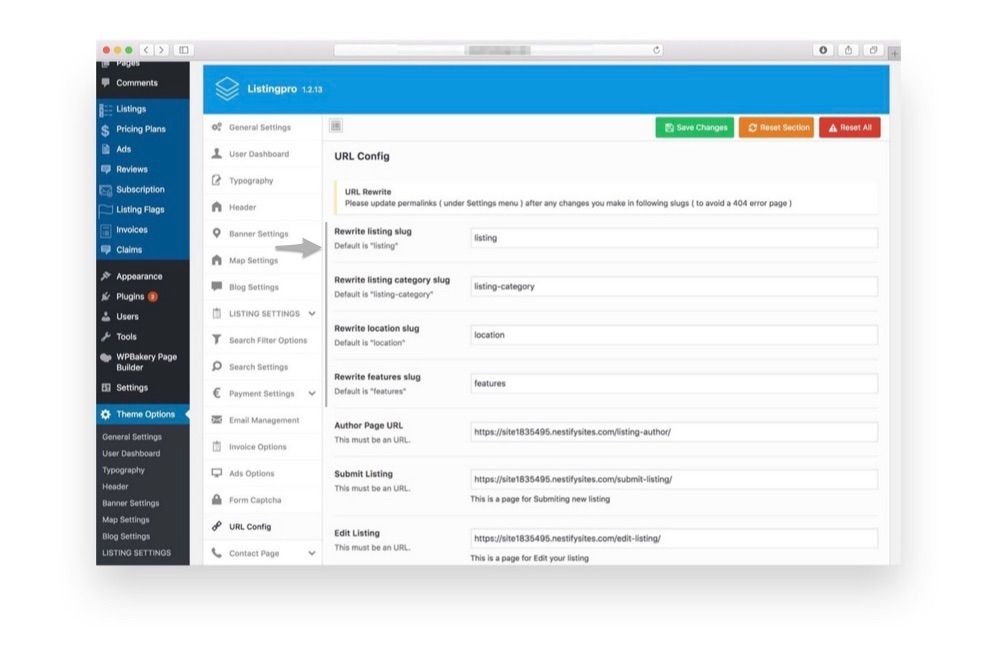
Keep in mind that if you imported all of the dummy content when you installed the ListingProWP theme, these pages been automatically created for you and you will see the URLs in this section. However, if you want to change the URLs, you can do that here so your site continues to load properly.
STEP 4 – Determine How Listings Work
After taking care of the administrative side of things, it’s time to figure out how your listing pages will work on your site. To start, navigate to the Listing Settings section under Theme Options. Here you will see a ton of menu items. Let’s take a brief look at some of the key ones.
Listing Detail Page Layout Manager

Determine how you want the pages with business listings on it to look. You can choose from different layouts, each with various elements such as Maps/Contacts, Listing Features, FAQs, Reviews/Review Form, and Leadforms. You can disable any of them by dragging them to the disabled section.
In addition, the order of items are easily changed by dragging and dropping elements into position.
Listing View
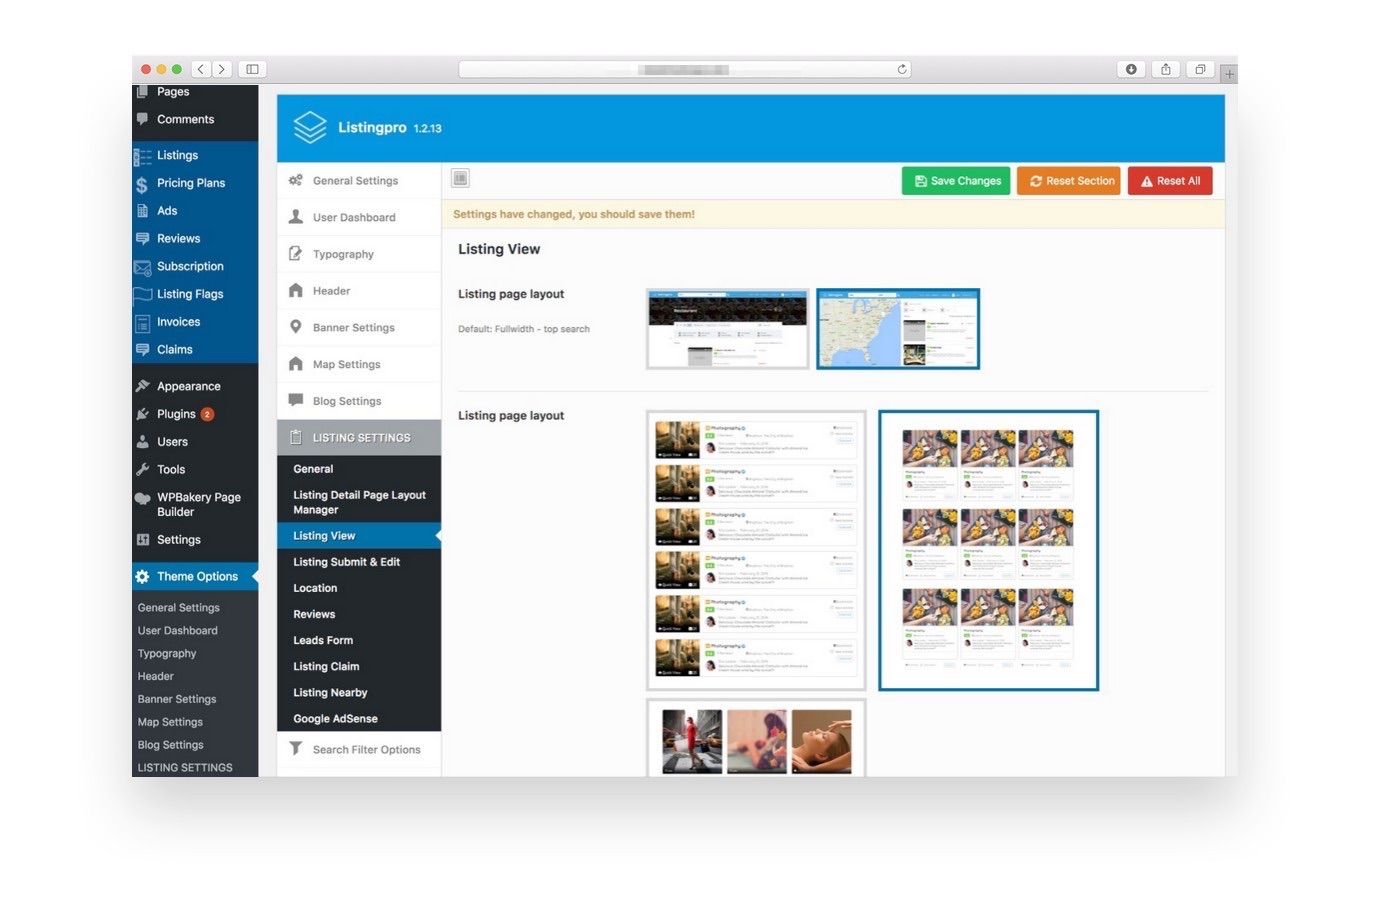
Here, it takes a simple click to choose how you want multiple listings to appear (Grid View or List View) on your website. In addition, you can choose whether to include a map view on each page or not.
Listing Submission
This is where you decide how people submit their listings to you to appear in your web directory. Go through each option and toggle on or off the settings that apply to you.
Make sure you look at it all because this directly affects how people will submit their listings to your site.
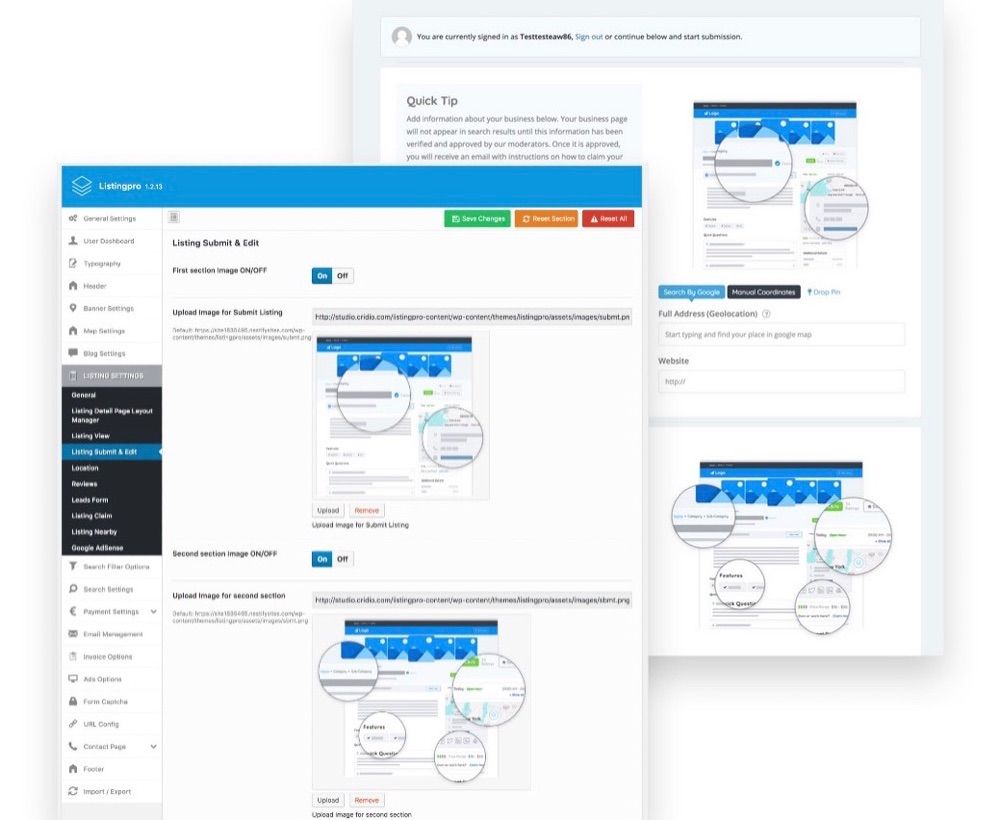
Here are some of the key settings:
- Image upload(s)
- Quick tips for short descriptions
- Address
- Phone number
- Website URL
- Hours
- Features
- Pricing
- Social media links
- And so much more
As you can see, if you fail to toggle on an essential setting, such as website URL, people visiting your directory will not be able to access the business website if they are interested. This is bad for your business and that of your user.
In addition to the above-mentioned, you can configure things like who has control over adding locations (you or Google) and whether to enable reviews.
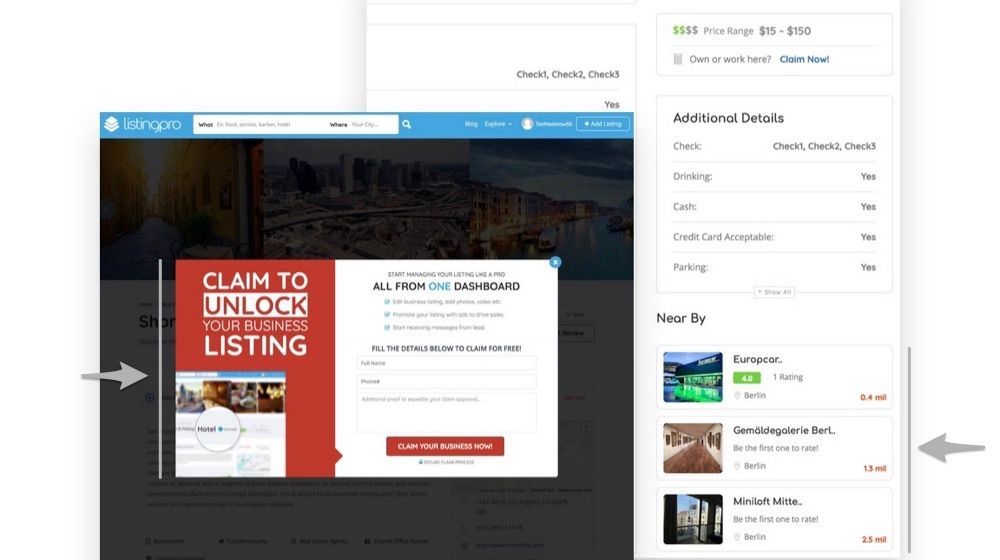
You also can add a leadform, a claim option for listings, nearby listings based on location or interest, and your Google AdSense into the listings you show on your site.
STEP 5 – Set Pricing Plans
One of the great things about running a site directory is that you can monetize it by offering paid listings. Of course, if you are not planning to charge people to post their business to your site, you can skip this part, because by default, ListingProWP sets up a free plan when you import the dummy content.
But if you do plan on creating paid plans, this is where you set all that up.
Navigate to Pricing Plans > Add New Price Plan in the WordPress dashboard to start the process.
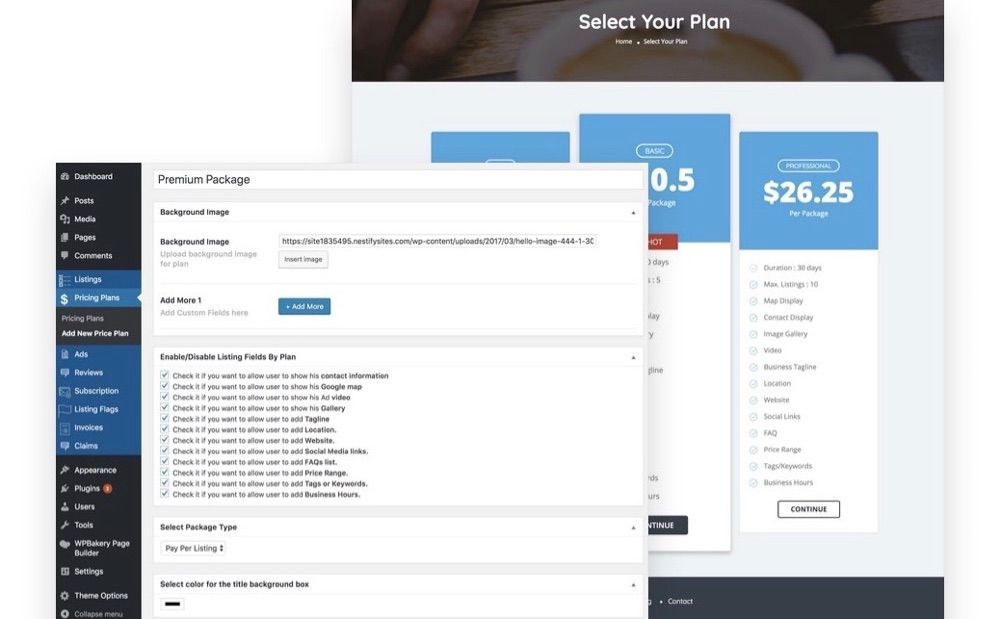
Choose a background image, add custom fields, and click on the Ad Posting options you want to allow each user to show when they submit a listing to your web directory. For example, allow businesses to show contact information, Google Maps, website URLs, galleries and video, and even social media links.
Scroll down to choose the following for your paid listings:
- Whether to charge per listing or for a package
- The color of the background title box
- The actual price of the listing(s)
- The duration of days the listing will post
- Whether to allow paid users to continue with the free plan after their listings expire
- And whether you want to make this plan "Hot"
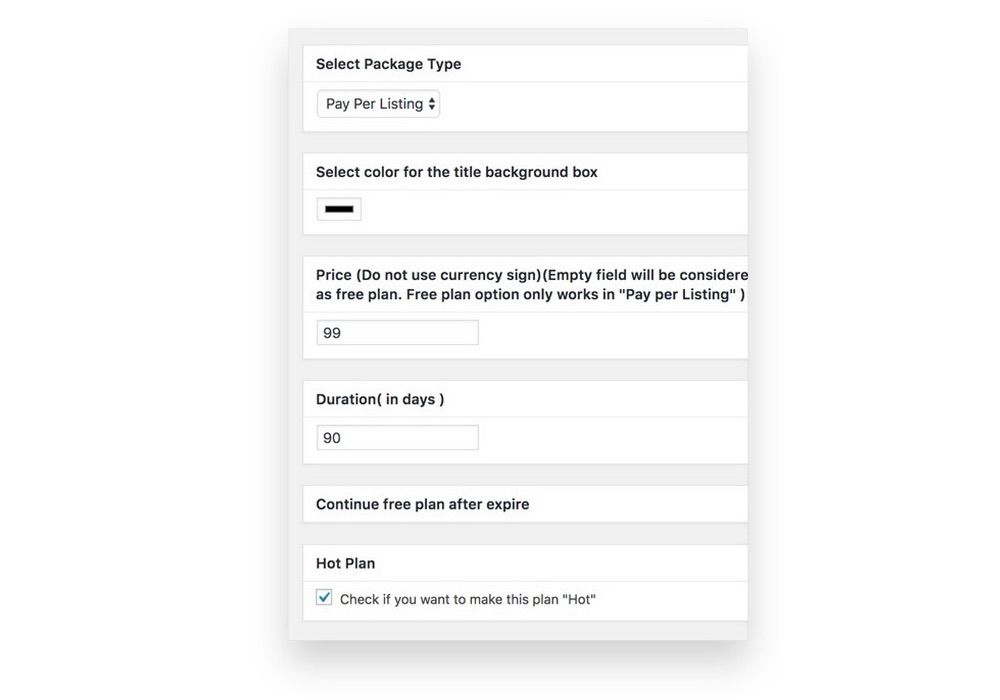
As you can see, there is a lot to configure if you want to monetize your directory and charge people for listings. Luckily, ListingProWP makes it very easy to set up and understand.
You should have a fully functioning web directory ready to go, minus any listings because you have to recruit those. The included free add-on for WP ALL IMPORT that allows for bulk importing would be useful for this!
However, it is important to look at how to manage your directory now that it’s ready to go live.
According to the team behind ListingProWP, most of your management needs are handled in the following WordPress dashboard menu items:
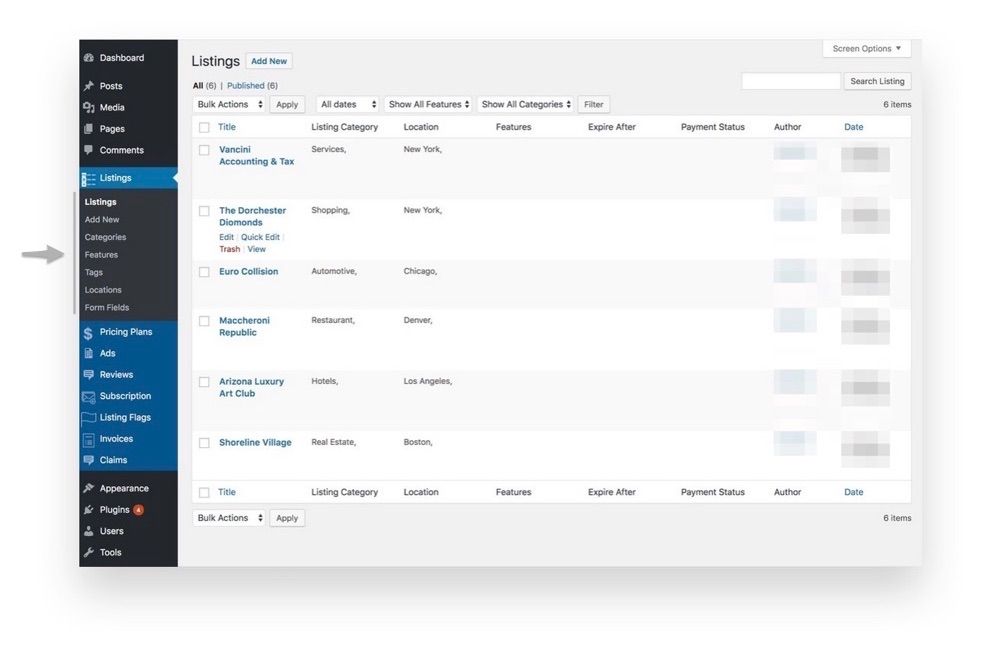
For instance, if a new listing is submitted to your directory, navigate to the Listings tab and see it as Pending Review. Here you can see what information was included with the listing and whether or not you want to publish it on your site or not. Simply click Publish and add that listing to the others if you do.
You can also manage your ads in the Ads tab, business claims tab, and invoices in the Invoices tab.
And there you have it!
You have now successfully created a fully functional website directory, without having to add a single paid plugin from a third-party to your site. Instead, you utilized the exclusive end-to-end WordPress directory theme and built everything from the ground up from within the theme itself.
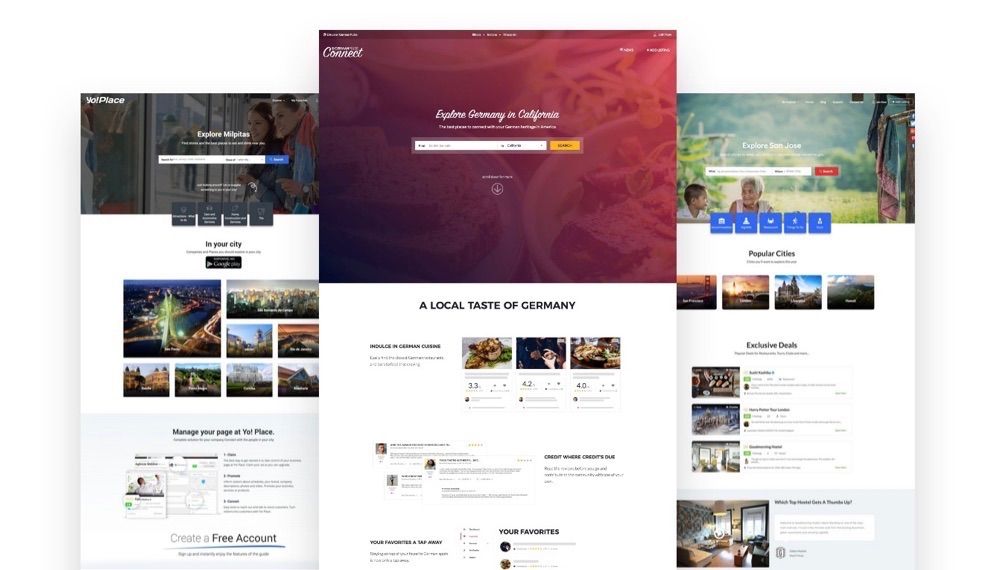
If you are curious to see how ListingProWP works in real life, check out these amazing case studies.
Sustainne.com uses ListingProWP to build a strong sense of community amongst those looking to spur the local economy, sustain the environment, and connect with others dedicated to the same values.
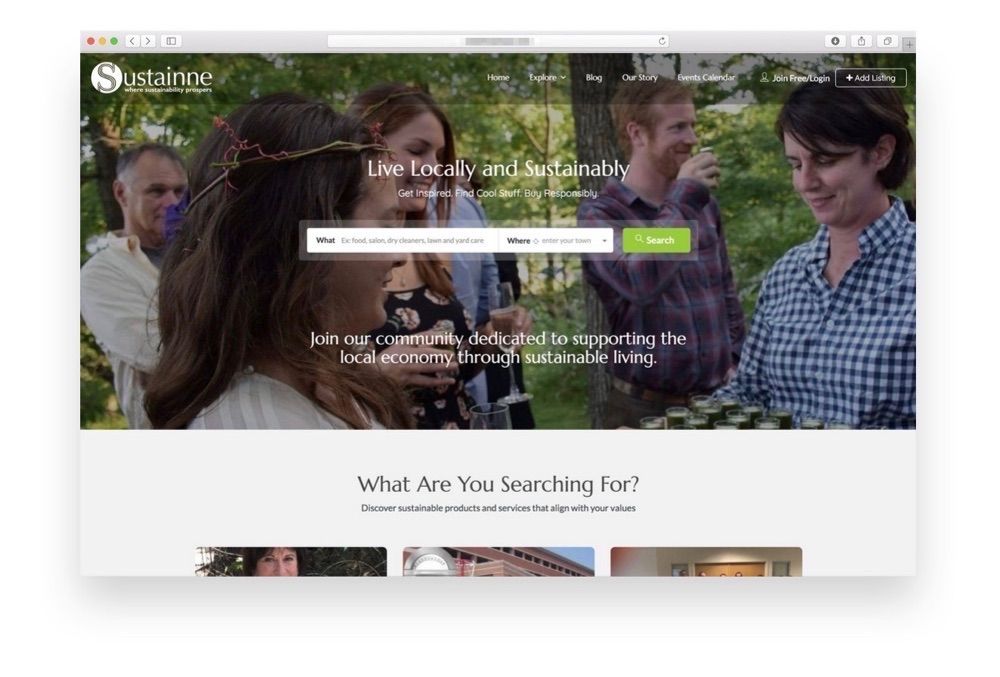
If you want to create a WordPress web directory, ListingProWP comes highly recommended. Its ease of use, non-reliability on third-party tools, and beautiful design encourages people to list their businesses. It gives you the tools to build an effective site directory catering to those in your local area.
ListingPro and the team behind it took directory theme market by storm introducing the best product ever. However, what surprises me the most is that they still find countless ways to improve their already superior product. If you need to build a listing website, then look no further.